Pages

Showing posts with label wordpress. Show all posts

Sunday, January 15, 2012

How To Analyze WordPress Plugin Performances

I have been using WordPress ever since I started blogging here on Ghacks in 2005. It has been a pleasant ride most of the time, with the occasional rough bump down the road. As a WordPress administrator, you have access to thousands of different plugins that extend or improve the blog’s functionality. One issue that you may experience after installing plugins is that your site may load slower than before. Plugins can have an impact on the site’s load time, the server load and overall performance. The more plugins you have installed, the slower your site may become.

That’s a big issue in times where search engines are favoring fast loading websites. It also may mean that you have to upgrade your hosting to keep up with the performance requirements of your website.

P3, Plugin Performance Profiler, is a free WordPress plugin that analyzes the performance of frontend plugins. Frontend plugins are all plugins that are executed during page loading time.

Installation

Just open Plugins > Add New in your WordPress admin dashboard and search for P3. Click on the Install Now link to install the plugin, and on Activate on the next screen to activate it. You can alternatively download it from the official WordPress Plugin repository to install it manually on your blog.

Usage

Open Tools > P3 Plugin Profiler and click the Start Scan button to run the standard scan. The program will load several posts and pages from your site to calculate individual plugin performance data. You can alternatively run a manual scan instead, which allows you to pick the pages and posts that you want to load on the site. The benefit here is that you can specify exactly which posts and pages you want to use for the sample.

Once done, results are displayed in the program interface.

wordpress plugin performance

You should now see the average plugin impact on the site’s load time, the number of MySQL queries that are run per visit and a runtime breakdown by plugin.

detailed breakdown

detailed timeline

If plugin impact appears to be to high, or if you have a plugin installed that is using a lot of resources, you may want to consider replacing it or removing it completely from the site. You can deactivate plugins before you run the test again to see if the deactivation has a positive impact on the frontend page loading times. You could furthermore install an alternative to see if it is lighter on the resource side.

There is however no option to compare scans with each other, which is unfortunately. It is also not clear why the performance profiler itself is listed in the results, as it does not really make a whole lot of sense.

Still, if you are hearing complaints from readers or are noticing server peak load times and resource usage, you may want to check out the Plugin Performance Profiler plugin to see which plugin may be causing it.


Monday, January 9, 2012

Run A Local WordPress Blog With One-Click

WordPress is one of the most popular blogging platforms currently available on the Internet. Popular sites like Techcrunch, Gizmodo or yours truly are all powered by WordPress. Users who are just getting started have a few options at their disposal. They can start with a blog over at WordPress.com, get their own website and self-host WordPress there, or start with a local version of the blogging software.

WordPress Portable is a free program for Windows that automatically ships with everything needed to run WordPress locally. All you need to do is to extract the package contents on your system after download and start the WordPress Portable executable afterwards.

The blog is available from that moment on and you can do all the things that you can do on a self-hosted WordPress blog as well.

wordpress portable

Just open http://localhost/wordpress/ in your web browser to open the local WordPress installation. Click on log in and enter admin as the username and password to open the administrative interface of the blog.

First thing you may want to do is to upgrade the blog to the latest version. You should see a notification at the top of the admin interface on first run. The update takes considerably longer than it would on a remotely hosted website.

local wordpress installation

Once done you can start to install new themes and plugins, modify settings, and to start writing your first posts. You basically can do everything that you can do on a self-hosted WordPress installation.

The local installation can be used for several purposes. This includes local theme and plugin development and testing, testing new WordPress versions before you upgrade your live blogs on the Internet, or to showcase blogs to clients or friends. Another option is to use the local WordPress blog to store your own personal writings, a diary for instance or important information that you need to write down or want to collect.

WordPress Portable ships with Apache, PHP and MySQL included, which means that you do not have to install those technologies prior to installing the blog. New users benefit from the simplicity of the solution, while advanced users may like the ability to put the package on a portable drive or stick, or to use it to quickly run tests locally.

The project lacks documentation which can be a issue for some users. It is for instance not clear if and how Apache, MySQL and PHP can be updated to newer versions, or if it is possible to import the database of an existing blog (the later may be possible with the help of plugins).

WordPress Portable is only available for the Microsoft Windows operating system. Interested users can download the latest version of the package, weighting in at about 10 Megabytes, from the developer website.


© Martin Brinkmann for gHacks Technology News | Latest Tech News, Software And Tutorials, 2012. | Permalink |
Add to del.icio.us, digg, facebook, reddit, twitter
Post tags: , , ,


Tuesday, January 3, 2012

WordPress 3.3.1 Security Update Available

A new version of the popular blogging software WordPress has just been released. WordPress admins should already see update notifications in the dashboards of the blogs that they administrate. The update is also already advertised on the official WordPress website.

It is as usually possible to update the blog right away from within the admin dashboard if it has been configured for that, or via file transfer clients if the former option is not available.

The blog post that announces the new version of WordPress mentions 15 maintenance related fixes and one security related fix that have been applied to the new version. It fails to go into detail but links to the bug tracker listing which details every fix except for the security issue.

wordpress 3.3.1 update

At least one of the issues that have been fixed in WordPress 3.3.1 seem to have affected this site. I was recently noticing issues with the author biographies not being displayed anymore on article pages, and it took a whole day to find a working workaround. It appears now that this was a bug that got fixed with this new WordPress release.

The security vulnerability is only briefly mentioned in the blog post where it is described as a cross-site scripting vulnerability that is affecting WordPress version 3.3.

The WordPress Codex lists all files that have been revised in the new version. It is theoretically possible to only upload those files to the site to save time and bandwidth.

I have already updated several WordPress sites to version 3.3.1 and did not notice any odd behavior or issues with the updating or site operation.

WordPress admins are encouraged to update their blogs as soon as possible to protect it from the security vulnerability and to resolve the stability issues that have been fixed with the update.


© Martin Brinkmann for gHacks Technology News | Latest Tech News, Software And Tutorials, 2012. | Permalink |
Add to del.icio.us, digg, facebook, reddit, twitter
Post tags: ,


Tuesday, December 13, 2011

WordPress 3.3 Now Available

The developers of the popular blogging platform WordPress have released version 3.3 just a few minutes ago. WordPress 3.3 update notifications should appear right in the admin interface of the blog. Users can use the internal updater to update from within the admin interface, or by downloading the new version from the official site to update manually.

The What’s New page at the WordPress Codex highlights the – many – changes of the new version. WordPress admins will instantly notice several changes to the applications admin interface. A new toolbar is displayed on top of the dashboard that combines the features of the admin bar and the admin header.

wordpress admin bar

The new bar links directly to plugin and theme updates, comments awaiting moderation and the New menu with options to create new content on the blog. (There is a function to remove some of the elements that are shown in the admin bar. Credits to Sergej Müller)

Another change are “fly-out” menus in the admin interface. All submenus of a menu are displayed when you hoover the mouse over the menu. This saves a click and improves the admin’s workflow.

WordPress editors will notice a new file uploader. The developers have done away with the four upload buttons for specific type of media, and replaced it with a single button. The new uploader supports drag and drop operations and file browsing to select files to upload. Support for rar and 7z files have been added to the file uploader.

wordpress drag drop upload

WordPress admins who switch between themes regularly will notice that widgets are not lost anymore when they do that.

A video has been created that highlights several of the new features.

The WordPress backend has been updated as well with hundreds of bug fixes and performance improvements. It is to early to tell if the improvements will have a significant impact on the blog’s server resource usage or loading times.

Have you updated your blog to WordPress 3.3 yet? If so, what do you think of the new version?


© Martin Brinkmann for gHacks Technology News | Latest Tech News, Software And Tutorials, 2011. | Permalink |
Add to del.icio.us, digg, facebook, reddit, twitter
Post tags: , ,


Thursday, November 17, 2011

Fat Pings, What Are They, Why You Need Them As A Webmaster

Content scraping is a big issue on today’s Internet, and a challenge for search engines to get it right. It basically comes down to the question of attribution. Who is the original author of a piece of content and on which website was it published first. Search engines get that right most of the time. Sometimes though they fail and it hurts the original content creator badly when that happens.

Why is it bad? Because search engines rank content in their search results. If they believe you are the creator you are usually ranked higher than a site that has copied the content, if such a site is ranked at all.

The reality is this. Sites that scrape contents are easy to setup (using RSS feed mostly), require barely any maintenance and earn the creator money. These sites publish copied contents shortly after they have been published on the original website. As long as people can make money from this method, they will use it to do just that.

Fat Pings are one way to resolve the situation. The idea is simple. When you publish an article you ping a trusted source to confirm that you site is the original location of that article. It does not really matter if you do it 10 seconds before the scraper does the same or one hour, it is only important that you do it before the scraper does. This obviously has consequences for original content creators who do not make use of Fat Pings, as it is quite possible that scraper sites may make use of Fat Pings for an extra advantage.

How do you cope with that situation? You configure all of your sites to support Fat Pings. Here is how that is done.

If your blog is hosted on WordPress.com or Blogger, then you do not need to do anything. Fat Pings are automatically sent out. If you are running a self hosted WordPress blog, you can install the free PubSubHubbub extension to inform search engines when they blog has been updated.

The suggestion to use Fat Pings comes directly from Google. You can read up more about it on Search Engine Journal and Labnol.


© Martin Brinkmann for gHacks Technology News | Latest Tech News, Software And Tutorials, 2011. | Permalink |
Add to del.icio.us, digg, facebook, reddit, twitter
Post tags: , , , ,


Tuesday, October 25, 2011

Speed Up WordPress Page Loading Times By Removing l10n.js

I recently noticed that my WordPress blog’s page loading times increased through the roofs which made me reevaluate everything that contributed to the loading times of the website. I implemented a few changes on the blog to improve page loading times. I first got rid of the three social networking buttons pointing to Google Plus, Facebook and Twitter, and replaced them with the Add This script instead. The benefit here was that it reduced the external JavaScript code that needed to be loaded for the functionality from three to one.

I also noticed that articles with hundreds of comments were loading significantly slower than pages with less comments. This made me reduce the number of comments per page to 50 root comments (plus their answers).

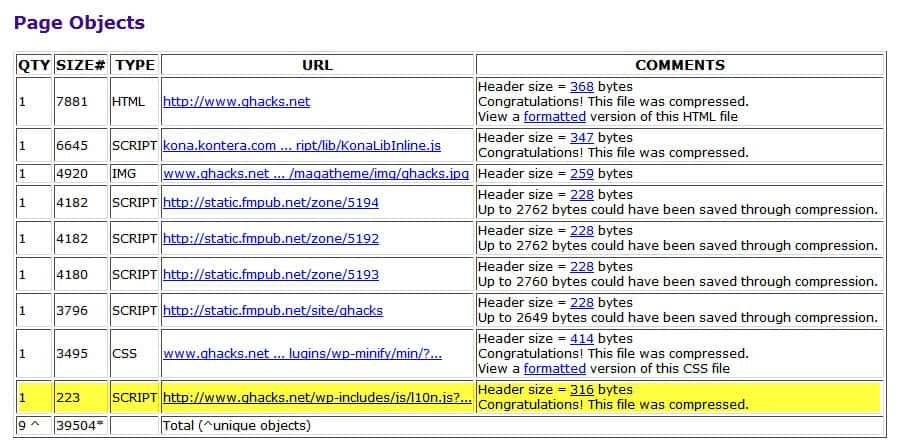
Today I noticed that WordPress added another JavaScript to ever page. The script in wp-inlcudes/l10n.js that is related to the admin bar that the WordPress developers added to one of the recent versions of the blogging platform.

While it is a small file with a size of 233 bytes it is still a script that is loaded by anyone, not just the admin of the blog. This somehow does not make a lot of sense. The important thing here is that the blog needs to make the request to load the element, not the time it takes to load the 223 bytes.

ghacks page objects

WordPress administrators may want to remove the JavaScript element from being loaded by every blog visitor to speed up the blog’s page loading times. The easiest way to remove the l10n.js from being loaded with WordPress is to unload it in the functions.php file in the WordPress theme folder.

All you need to do for that is to add the following line of code to the end of the functions.php file.

wp_deregister_script('l10n');

Please note that this may disable part of the admin bars toolbar functionality. Users over at Stack Exchange have found a way to keep the JavaScript loaded for administrators of the blog.

if ( !is_admin() ) {
function my_init_method() {
wp_deregister_script( ‘l10n’ );
}
add_action(‘init’, ‘my_init_method’);
}

Just add this code instead to the functions.php file.


© Martin Brinkmann for gHacks Technology News | Latest Tech News, Software And Tutorials, 2011. | Permalink |
Add to del.icio.us, digg, facebook, reddit, twitter
Post tags: , , , ,