Pages

Showing posts with label screenshots. Show all posts

Monday, December 5, 2011

Tweet Screenshots with EasyScreenshot

Many screenshot applications have been covered here for capturing WebPages, selected areas, full screen, etc… We all get the idea. Screenshots are screenshots. EasyScreenshot is a different screenshot application because it allows you to take a screenshot and upload it to your Twitter account automatically. Then you can tweet it at will. This makes screenshot sharing with others incredibly easy. You can attach text and brand the screenshot so everyone will know it came from you and the application has watermarking capabilities to top it all off. If you are a constant user of Twitter, this application is a must-have that will add a whole new element to your tweets.

Installation is just as easy as any other binary file installation. Follow the prompts, you know the routine. The EasyScreenshot interface is plain and simple and self-explanatory for the most part, as you can see:

easy screenshot

There are a few things you need to know about this application, so this is a short tutorial to guide you through the screenshot tweeting process with EasyScreenshot. Click the Settings button to specify the folder that you want to save the screenshot in and specify other options.

screenshot settings

Under the “Using the Image” heading, there are three options: Save To EasyScreenshot Folder, Prompt where to save and Copy Image to clipboard. Selecting the option to save to the EasyScreenshot Folder is going to give you a roundabout way to access the screenshot later on and it is really not a practical option, as you have to navigate to the folder and nobody has time for that and it is simply annoying. Rather, create a folder on your desktop and check the box next to “Prompt where to save” so you can easily find the screenshot at your leisure.

Now you can choose your TwitPic Uploading options. If you want to simply upload it to you Twitter account and tweet it later, don’t check “Tweet the screenshot” because it will instantly tweet it. To get any of it to work on you Twitter account, you need to enter your Username and Password in the field provided. After you have specified the desired settings, click the Save Settings button in the bottom pane. All you have to do is choose your screenshot and method of capture, take the screenshot and it is instantly uploaded or tweeted. That’s all there is to it!

You have shared the screenshot with your friends on Twitter now. This application is not for taking typical screenshots in the manner which you are accustomed to. It is specifically for sharing on Twitter. This comes in handy for business purposes when you need to quickly share a screenshot with an associate. They can then tweet you back and communicate whatever needs to be communicated and you can move on from there. The screenshot above was tweeted just for fun because the user thought it would be appreciated by his friends and is only an example of what you can do. Share selected areas or whole web pages with the option to include the URL and a message describing your intentions. Now go and tweet away!

Download EasyScreenshot here. The program is compatible with all recent 32-bit and 64-bit editions of the Microsoft Windows operating system.


© Melanie Gross for gHacks Technology News | Latest Tech News, Software And Tutorials, 2011. | Permalink |
Add to del.icio.us, digg, facebook, reddit, twitter
Post tags: , ,


Sunday, October 23, 2011

Web Page Thumbnails, Create Website Screenshots

Sometimes you may feel the need to create a screenshot or multiple screenshots of a website. This can be handy for archiving or reference purposes for instance. While you could create a screenshot easily with tools offered by the operating system, doing so usually involves several steps and is therefor more time consuming than using specialized tools for the job. Besides, the procedure may not support scrolling windows.

Web Page Thumbnails is a free software for Windows that can be used to take screenshots of any web page easily. You need to install the program first before it can be started and used.

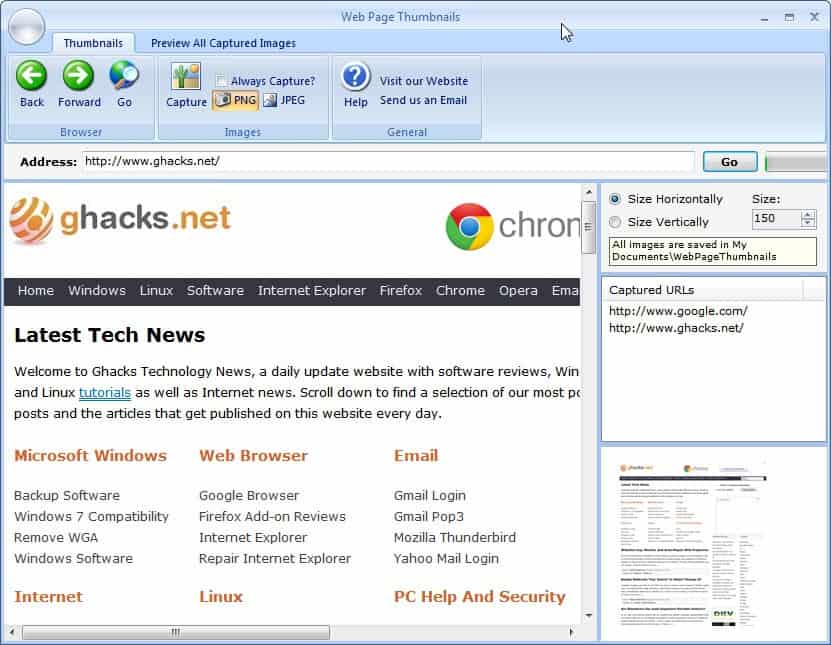
All that is needed to do to take a screenshot of a website is to load the address in the Web Page Thumbnails interface. You can paste urls into the form or enter them manually. A click on Go loads the web page in the program interface.

web page thumbnails

You can capture individual pages with a click on the capture button in the interface. Users who want to take screenshots of all web pages that they load in the program can check the Always Capture setting to have the program take screenshots automatically.

The default format png can be changed to jpeg in the main interface as well. Links and other elements of the currently loaded web page are active, a click on a link loads the link target in the program for instance. This makes it very comfortable if multiple pages of the same website need to be recorded.

Users who want a full size screenshot of the web page need to modify the vertical or horizontal size of it in the right sidebar. The size is increased with the up and down cursor keys and not by typing in a different number. The program by default will capture the full scrolling window in the screenshot and not only the visible area.

All screenshots are saved to the My Documents folder. They can be opened there or directly in the program with a click on the Preview all captured images tab.

Web Page Thumbnails is a solid application for users who want to take screenshots of one or multiple web sites. The program could use an option to import a list of web addresses into the application to take screenshots from. It seems to rely on the Internet Explorer rendering engine.

Windows users can download the software from the developer website. The program is compatible with 32-bit and 64-bit editions of the operating system.


© Martin Brinkmann for gHacks Technology News | Latest Tech News, Software And Tutorials, 2011. | Permalink |
Add to del.icio.us, digg, facebook, reddit, twitter
Post tags: , , , ,


Monday, October 3, 2011

Webpage Screenshot, Edit, Save Screenshots In Google Chrome

I personally do not have the need for a web based screenshot solution like Webpage Screenshot for the Google Chrome browser. The core reason for this is that I use a desktop application – Snagit – for the task which allows me to take screenshots in any application and not only in Chrome.

Sometimes however you may not be able to install desktop apps on your system, which is for instance the case in most corporate computing environments or if you happen to own a Chromebook. In those cases you may have to settle for the next best solution, which may be Webpage Screenshot.

When you click on the extension icon in the Chrome address bar after installation, you see the three options Visible Screenshot, All Page Screenshot and Beta: Edit Content in the context menu.

The first two options should be self-explanatory. You can use the first to take a screenshot of the currently visible area on the screen, the second to take a screenshot of the whole page which means that scrolling pages are supported by the extension.

webpage screenshot

The third edit option finally allows you to edit the page before taking a screenshot. You can for instance remove elements from the page or add text annotations to it.

The extension loads the created screenshot in an editor-like mode afterwards regardless of choice. Here it is possible to use some basic editing tools to make modifications to the page.

webpage screenshot edit

The edit toolbar contains options to add text, arrows, lines or shapes on the screen to highlight, remove or add information.

You can save the screenshot in the end to the local computer system, use the share button to upload it to the Webpage Screenshot image hosting service or print the screenshot on a connected printer.

The options, which can be accessed via a right-click on the icon or a click on Options in edit mode, can be used to switch from saving screenshots in the png format to jpg and to edit the image header and footer information.

Webpage Screenshot is a handy extension for Chrome users who take screenshots of web pages open in the Chrome browser regularly. The functionality is solid, and the ability to edit the page before taking the screenshot is nice to have. A blur option is missing from the edit tools option, the only workaround is to either edit the element before taking the screenshot or to paint over it afterwards.

Chrome users can download Webpage Screenshot from the official Chrome Web Store.


© Martin Brinkmann for gHacks Technology News | Latest Tech News, Software And Tutorials, 2011. | Permalink |
Add to del.icio.us, digg, facebook, reddit, twitter
Post tags: , , , ,


Tuesday, September 27, 2011

Create Screenshot Sequences With Snap Install

I create a lot of screenshots throughout the day, at least one for every application that I review. I have been using various screenshot tools over the years for that, including the Print Screen key on the keyboard and pasting the contents of the clipboard into an image editor or the more recent Snippy. Currently I’m using the commercial software SnagIt for my screenshot taking needs.

Snap Install is a specialized program that can be used to take screenshot sequences effortlessly. It has been designed specifically for making screenshots of installation procedures and product manuals.

The program is completely controlled with the mouse, which is handy and comfortable on the one hand, but also restricted on the other.

snapinstall

The program displays an initial configuration menu on startup. Here you define the title and author of the project as well as the save location of the screenshots on the local system and an optional logo.

Once done click start to begin taking screenshots. You take screenshots with a middle-mouse click after selecting a screen with the left mouse button.

Each screenshot gets saved into the selected directory as a png file automatically. You do not see a dialog or editor that interrupts the process (if notifications are enabled on the system you see a notification in the system tray area). This is a very comfortable way of creating multiple screenshots in rapid succession.

You still may need to edit the screenshots that you have created afterwards, considering that their resolution or size may not fit the document.

You can create a pdf document with all screenshots automatically in the end. I’d say that is not such a good idea considering that you may need to edit the images before creating such a document. Another issue here is that all images are used in the creation, which is a problem if you have created some screenshots that you do not want in the document.

I have a few issues with the program that limit the program’s reach and functionality. It is for one not possible to map the screenshot taking to a different mouse button, which means that you may run into conflicts in programs that use the middle-mouse button for other operations. This is usually not a problem if you do a screenshot series of a program installation, but screenshots for a product manual could very well be affected.

The second issue is that you can only take full window or screen screenshots. You cannot select a smaller part of the screen for the screenshot. This may lead to additional editing work after taking the screenshots.

Regardless of that, if you are looking for a convenient program to take a number of screenshots in rapid succession, then Snap Install may be the program that you are looking for.

The portable software is compatible with all recent versions of the Microsoft windows operating system. You can download the software from the developer website. (via)


© Martin Brinkmann for gHacks Technology News | Latest Tech News, Software And Tutorials, 2011. | Permalink |
Add to del.icio.us, digg, facebook, reddit, twitter
Post tags: , , , ,