Pages

Showing posts with label windows tips. Show all posts

Thursday, January 19, 2012

How To Disable Restart Your Computer To Finish Installing Important Updates Prompt

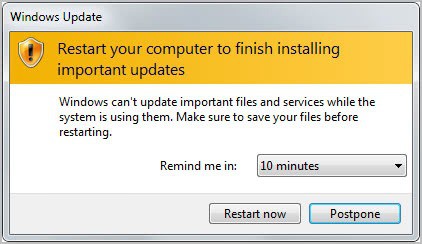
We have all been there and seen it. Whenever updates are installed in Windows that require a reboot, you are prompted in regular intervals to do so. These messages appear shortly after installing the updates, and then regularly until you do so. The Restart Your Computer To Finish Installing Important Updates prompt offers to postpone the update for 10 minutes, 1 hour or 4 hours. The prompt is then displayed again if the computer has not been rebooted in the meantime.

Many Windows users dislike the nagging prompt, especially if they are currently running tasks that would be interrupted by a reboot. This includes video rendering, an important download or upload, or a document that needs to be finished in the next hour or so.

restart your computer to finish installing important updates

While you could select 4 hours from the menu to see the reboot prompt after 4 hours, you may still like to disable the display of the update prompt for a longer period of time. This can be useful if you are currently in a day long presentation that requires the computer.

There are two options to deal with the issue. You could first stop the Windows Update service for the current session. This basically blocks the prompt and any attempt to install new updates until the computer is rebooted.

The following steps are needed for this:

  • Open up an elevated command prompt window. You can do that by clicking on the Start button of the operating system, entering cmd in the search form and using the shortcut Ctrl-Shift-Enter to open it with administrative privileges. A user account control prompt may be displayed.
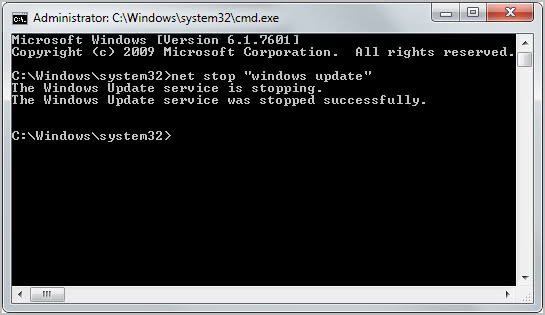
  • Run the command net stop “windows update” to stop the Windows Update service for the current session.

net stop windows update

You can restart the service with the command net start “windows update”. The service will also be started normally on the next start of the system.

The second option lets you disable the auto reboot option when users are logged on. This requires some Registry hacking and is only suggested for advanced users. You may also want to backup the Registry first before you make those changes.

  • Use Windows-r to bring up the run box. Enter regedit and hit enter to open the Windows Registry Editor.
  • Navigate to the following Registry key HKEY_LOCAL_MACHINE\SOFTWARE\Microsoft\Windows\CurrentVersion\WindowsUpdate\Auto Update
  • Locate the ForcedReboot key there and change its value from whatever it is set to to 0.

Please note that this works only under Vista, Windows 7 and newer operating systems.

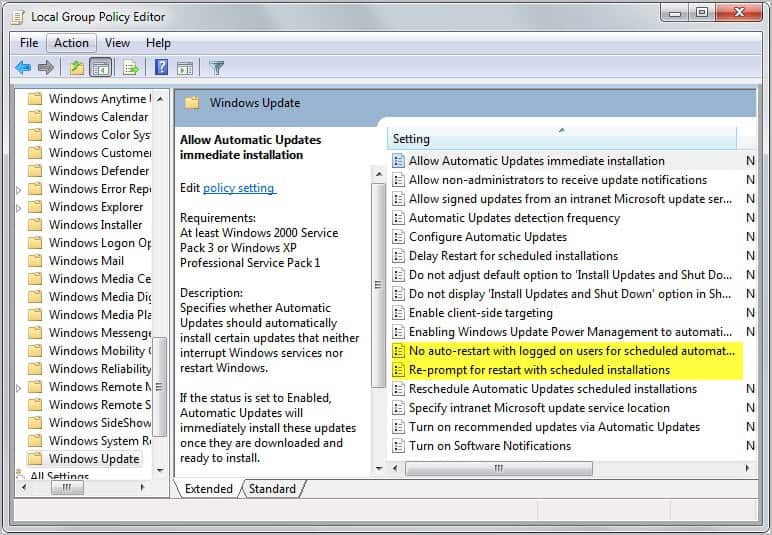
The third and final option is the Local Group Policy Editor which is only available in some versions of the Windows operating system. Go to Computer Configuration > Administrative Templates > Windows Components > Windows Update and locate the following two parameters:

  • No auto-restart for scheduled Automatic Updates installations
  • Re-prompt for restart with scheduled installations

Enable the first parameter to block automatic restarts after update installations, and set the second to a high enough period to receive the reboot prompt less often.

local group policy


Monday, January 9, 2012

How To Run The Advanced Disk Cleanup Version In Windows

The Disk Cleanup tool offers a great way to quickly free up some disk space by deleting temporary files that are no longer needed. It is in no way as complete or thorough as third party tools like CCleaner, but it gets the job done and does not require you to install another software on the system for that operation.

Most users do not know that Microsoft has integrated an advanced version of the cleanup tool in the Windows operating system. The core reason for that is that it can only be started from the command prompt, and not from menus or by clicking on a program icon on the desktop.

Lets first take a look at the standard version of Disk Cleanup. One of the easiest ways to start the Disk Cleanup is to use the shortcut Windows-r to bring up the run box, enter cleanmgr in there and tap on the enter key afterwards. This opens the program right away. There are other ways to launch it, for instance by entering disk cleanup in the start menu search form.

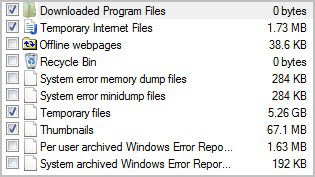
The standard Disk Cleanup tool can delete the following temporary files on the system. Included in the deletion are temporary files, thumbnails, or downloaded programs.

standard disk cleanup

Check out How To Clean Hard Drives In Windows 7 for general information about the cleanup software.

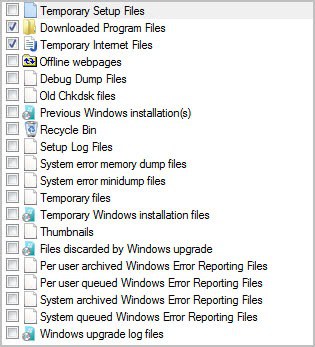
Compare that to the options the advanced cleanup tool offers.

advanced disk cleanup

Included now are debug dump files, system and user queued error reporting files, files discarded by Windows upgrade or setup and windows upgrade log files.

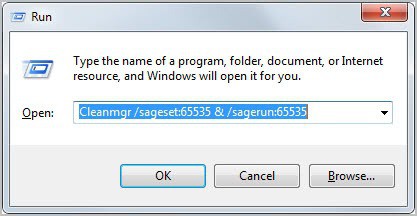
Here is how you can load the advanced Disk Cleanup Tool in Windows. Open the run prompt again with Windows-r. Now run the following command to bring up the advanced version.

Cleanmgr /sageset:65535 & /sagerun:65535

Just click ok afterwards to load the advanced Disk Cleanup Tool interface.

cleanmgr

Note that not all items are selected by default, which means that you need to look through the options to enable and disable items until you are satisfied with the selection.


© Martin Brinkmann for gHacks Technology News | Latest Tech News, Software And Tutorials, 2012. | Permalink |
Add to del.icio.us, digg, facebook, reddit, twitter
Post tags: ,


Friday, January 6, 2012

Before Dual Booting: What you Need to Know

The topic of dual booting operating systems has been covered in a few ways on this site, but here is a primer to provide you with some important information before attempting any dual boot. More users today are becoming aware of how useful and practical the Linux operating system is, in all its shapes and sizes. If there is any dual-boot that you want to have, it would definitely be along the lines of Windows 7, 8, or Vista with Ubuntu, Fedora, or Debian Linux operating systems. Ubuntu seems to be the most popular and it is an excellent operating system, in this user’s opinion. All this being stated, before you dual boot any operating system, you absolutely must prepare yourself! This is not a how-to on dual booting Ubuntu and Windows; it is a warning that you should carefully study all of the ins and outs about the process before proceeding.

ubuntu linux

For example, when you are dual booting any Linux operating system such as Ubuntu, the very first thing that you need to be aware of is that the Linux Grub will overwrite your Master Boot Record (MBR). This will mean that you will be able to boot your new Linux operating system in a hard drive partition, but you will probably not be able to boot back into Windows thereafter.

Rather than spend a day pulling your hair out trying to look for a solution, find a good guide on dual booting Ubuntu with Windows before you get started. This is an Ubuntu guide on the topic that happens to be immensely helpful and there are plenty of other links on the site to assist, should you run into any problems.

To get to the point, the very first thing you must do before dual booting Linux alongside Windows is backup your operating system. Don’t just backup the files and folders; backup the entire system on an external hard drive. If you put it on a partition and you are unable to access the partition after the dual boot, you are out of luck. It seems obvious, but always backup your system to removable devices or an FTP server. The advantage of having the external hard drive is that you have something tangible in your hands that you can restore your system with.

Secondly, create a system repair disk or buy one. If you have your Windows installation disk, that would be best, but the repair disk will be sufficient to get you into the recovery environment so that you can have a DOS prompt to work from in order to restore your MBR. As long as you have the full system backup and the repair disk, you have a parachute if you mess up the operation. Understand that Linux has a completely different language than DOS and the GNU Grub is not something to be messing with unless you know exactly what you are doing.

Make sure that you partition your hard drive properly before dual booting. DO NOT boot Linux onto the same partition on which you have installed Windows. That just about covers it.

Once you have an effective dual boot of Windows and Linux, you will be rather pleased with yourself and you get to enjoy the benefits of both operating systems. Also, a dual boot is much faster and more efficient than a virtual machine. Enjoy a safe dual boot.


© Melanie Gross for gHacks Technology News | Latest Tech News, Software And Tutorials, 2012. | Permalink |
Add to del.icio.us, digg, facebook, reddit, twitter
Post tags: , ,


Wednesday, January 4, 2012

How to Configure Windows Remote Assistance On Windows 7

Windows Remote Assistance is a tool that Microsoft has integrated into the Windows 7 operating system. It is in many regards similar to popular remote access applications like Teamviewer, as it allows Windows 7 users to ask someone else to take a look at their computer system over a local area network or the Internet.

The person looking at the computer can help troubleshoot PC issues by taking control over the user PC.

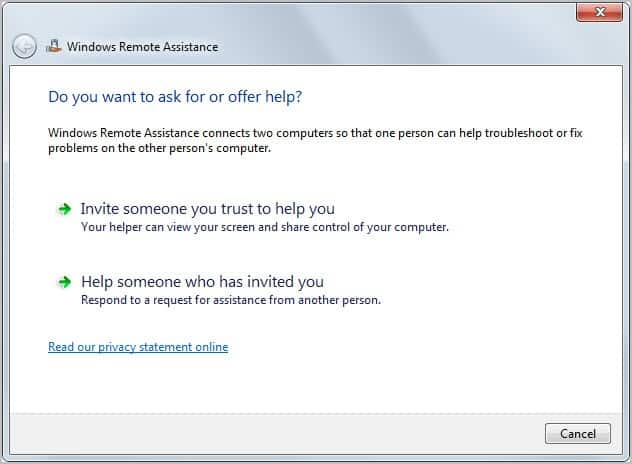
The process of setting up the PC to accept remote access requests is simple. Windows users first need to open Windows Remote Assistance by clicking on the start menu, and following the path All Programs > Maintenance > Remote Assistance. The following window will pop up upon execution of the program.

windows remote assistance

Two options are available:

  • Invite someone you trust to help you – Your helper can view your screen and share control of your computer
  • Help someone who has invited you – Respond to a request for assistance from another person

Please note that only invited users can connect to a PC remote using the feature. Your computer is safe if you have never configured invites for remote sessions before.

Select the invite option if you want someone to take a look at your computer. Some scenarios that come to mind are your parents that need help with a computer problem while you are in college, friends that require assistance and even business related aid if there is more than one office available.

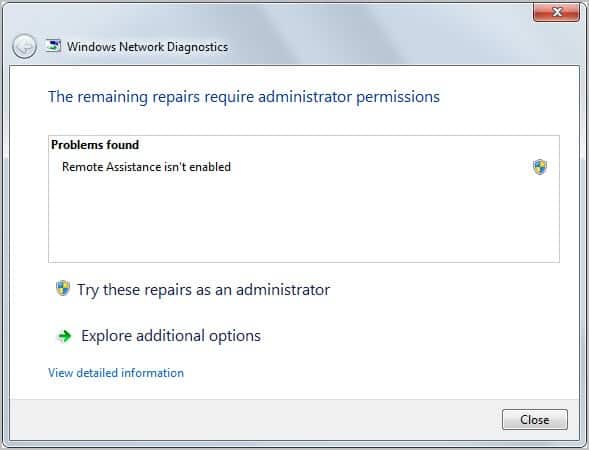
A repair option may be presented to you. Windows will automatically check if the computer is properly configured to send invitations. Just click on repair to resolve the issues. This intermediary screen will for instance pop up if the Remote Assistance service is not enabled on the PC.

remote assistance repair

Please note that you may need administrative rights to run the repair on the PC. You may also need to restart the Windows Remote Assistance wizard after the repairs have been completed.

The next screen is about sending out the invitation. Three options are provided of which only some may be available.

  • Save this invitation as a file – You can send this invitation as an attachment if you use web based e-mail
  • Use e-mail to send an invitation – If you use a compatible e-mail program this will start the e-mail program and attach the invitation file
  • Use Easy Connect – Use this option if Easy Connect is also available to your helper

remote access invitation

Note that the Easy Connect option may not be selectable. This can be the case if both computer’s are not running Windows 7, if access to the Internet is limited, or if the router does not support Easy Connect.

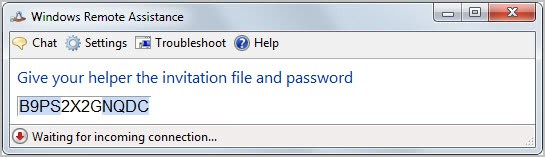
You basically create a file in this step that the remote user needs to access on a second PC to establish the remote connection to your PC. The setup program furthermore generates a unique password that needs to be entered to establish the remote session.

windows remote assistance password

All you need to do now is to wait for the remote worker to connect to your PC. A click on Chat opens a chat window, which may be helpful if you do not have other means of communication.

A click on Settings opens a preferences window where you can configure bandwidth usage (configured low by default), whether you want to log sessions and if the ESC key should stop the session.

The screen will change slightly once a remote connection has been established. You will then see a Pause button to pause access to the system temporarily and a stop sharing button. Pause is useful if you need to leave your computer for a moment.

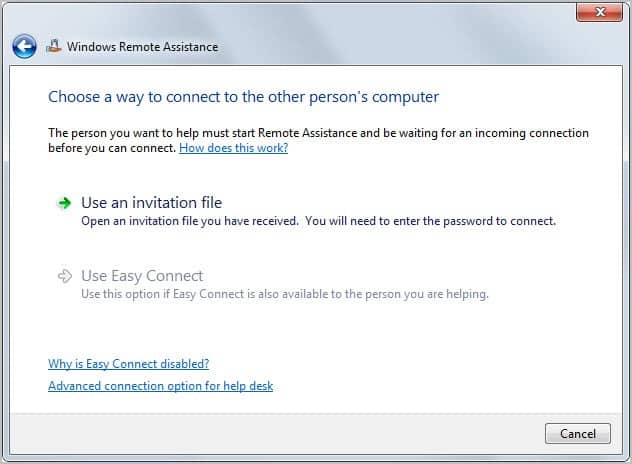
When you are asked to help someone, you perform almost identical steps. You first need access to the invitation file and the password. Start Windows Remote Assistance afterwards and select one of the available options:

  • Use an invitation file – Open an invitation file you have received. You will need to enter the password to connect.
  • Use Easy Connect – Use this option if Easy Connect is also available to the person you are helping.

windows remote invitation file

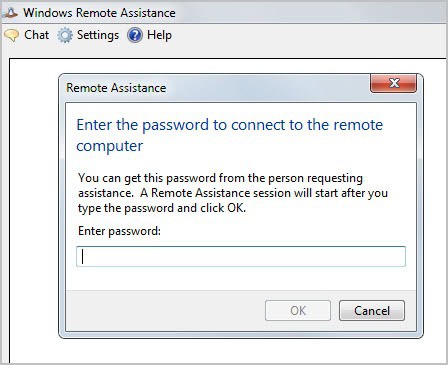
You are asked to enter the password in the second setup step.

remote password

Once done you can access the remote PC with your mouse and keyboard for as long as the session stays up.

Remote Assistance and Remote Desktop offer configuration options that you may want to take a look at. Enter Allow remote access to your computer in the Windows 7 start menu form and select the option that appears. You should see the following screen.

system properties

You can enable or disable the feature directly on the first screen, or click on the Advanced button to change the time the computer will accept connections from invited users. The default wait time is set to six hours which you can change to minutes, hours or days instead.

Here is a video demonstrating the setup and functionality

You find more information about Windows Remote Assistance at the Windows 7 News website.

Have you tried the remote assistance feature of Windows 7? If so, what was your experience?


© Martin Brinkmann for gHacks Technology News | Latest Tech News, Software And Tutorials, 2012. | Permalink |
Add to del.icio.us, digg, facebook, reddit, twitter
Post tags: ,


Tuesday, January 3, 2012

How to Partition and Un-Partition your Hard Drive in Windows

Hard drive partitioning is useful for creating virtual drives and creating disk volumes that can be used for storing particular file types. For example, if you did not want to keep all of your media and documents on Drive (C:), you can create a hard drive partition that will be a new volume separate from (C:). Many users are already familiar with hard drive partitioning, but un-partitioning a hard drive is another issue that some may not be familiar with. In other words, if you have partitions and you want to remove them and merge them back into Drive (C:), how do you do that? This tutorial will take you through the steps of hard drive partitioning and then explain how to un-partition in the event that you need to gain space back on Drive (C:). This pertains only to Windows 7 and Vista, as other versions of Windows do not have a built-in utility for partitioning and require third party software for the task.

This demonstration is performed on Windows 7, but the instructions are the same for Vista. There are a few ways to open the Disk Management console. The easiest way is to go to the start menu search box and type “disk management”. At the top of the resulting list, you should see the Control Panel option clearly listed and highlighted.

Partition a hard drive

disk management

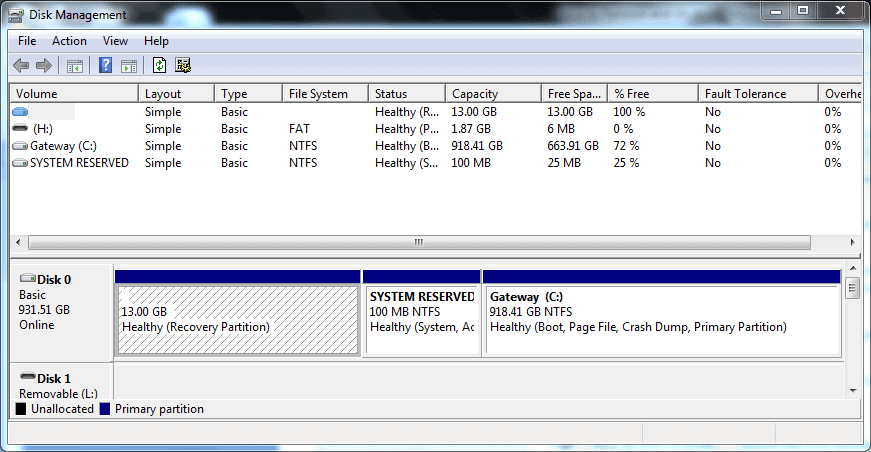
From here, press enter or click on “Create and format hard disk partitions”. This will open the Disk Management console. You will notice all drives displayed clearly. If you have never partitioned before, notice that there are already three partitions. This is normal for Windows and you never want to change these. The first is a recovery partition that is needed to recover the operating system if it becomes inaccessible. The second is called “System Reserved” and the third will be displayed as drive (C:). Essentially, these comprise the operating system except for the third which contains essential system files and free space.

hard drives

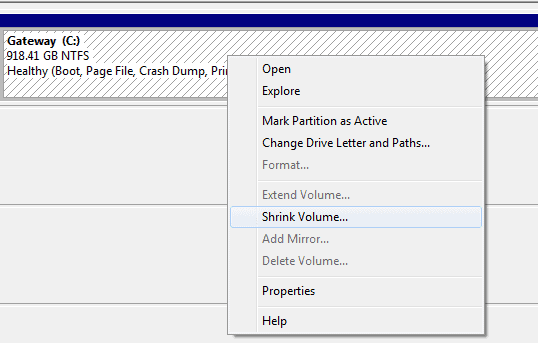
To create a new partition, right-click the (C:) drive and the context menu will list the option to “Shrink Volume”.

create partition

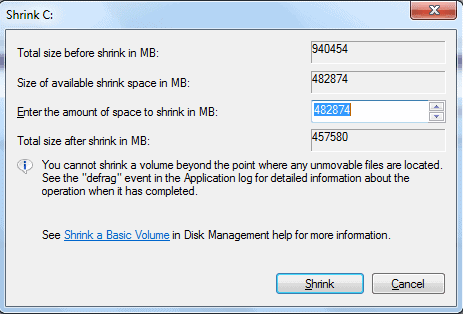
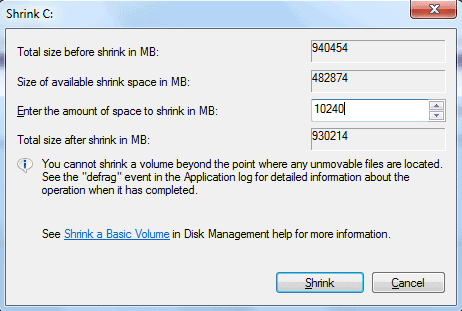
Click “Shrink Volume” and this will open a small pop-up that indicates that the utility is querying the volume for available shrink space. Essentially, you will be “shrinking” a portion of the drive and it will become a separate partition. You can begin doing this when the following window appears:

shrink volume

Specify the size for the new partition. In the highlighted blue field, you will see the full amount of space available to shrink next to “Enter the amount of space to shrink in MB”. Since you will be entering the size of the new partition (shrink) in MB, understand that 1GB is 1,024MB. If you want to create a new partition of 10GB, for example, you would enter 10,240. If you want to create a larger partition, you will need a calculator for odd sizes like 17GB or 183GB. In this case, we are going to create a 10GB partition.

shrink

After entering the desired size for the partition, click Shrink and shortly a new unallocated partition will be created. This is unallocated space and is not yet usable. It needs to be formatted to create a healthy partition. Right click on the new partition and select “New Simple Volume” from the top of the context menu. This opens the New Simple Volume Wizard, which allows you to set up the formatting and Drive path with an assigned letter. When the Wizard opens, click Next and the consecutive window will ask you to specify the size of the drive again. As long as you want it to be the size you originally specified, there is no reason to change the size, so click Next.

create new hard drive

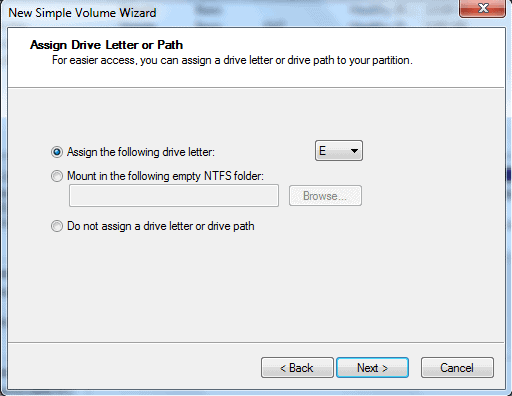
Here you have the option to assign a drive letter and path. The default path will be the drive letter. Since this is a basic tutorial, the options of mounting to an empty NTFS folder or formatting to formats other than NTFS will not be explained. If this is the first partition you are creating, the default drive letter will be (E:). You may click the dropdown menu and select another letter if desired, but it is not necessary. Click Next and this will take you to the formatting options.

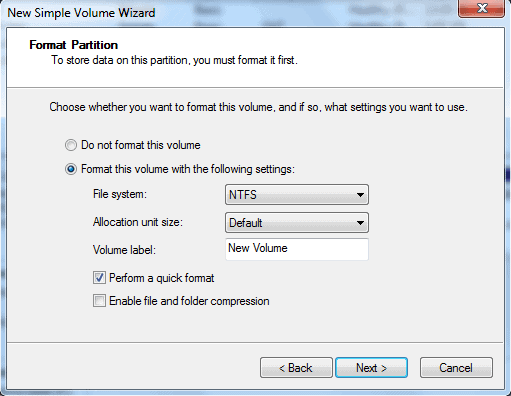
format hard drive

In this window, you can choose different file system types, specify a name for the partition and enable file and folder compression. To keep it simple, let the defaults remain as they are and click Next unless you would like to name the volume first. If you wish to name it, enter the desired name in the Volume label field and then click Next. The final window will open and all you have to do is click Finish and your new partition is formatted and ready to accept files or be used as a virtual drive.

You may do this for as many partitions as you may need. For example, when setting up a dual-boot, you may need to create up to three additional partitions for the second operating system to be installed. That is all up to you and it is a different subject entirely.

Un-Partitioning

Once you have gotten the procedure down for creating new partitions and you have used them, you may find at some point that you want to remove the partitions and merge the disk space back into drive (C:). In order to do this, you will need to open the Disk Management console again and choose the partition that you want to remove. Right click the partition and select Delete Volume from the context menu. This will erase all data on the partition, but that is fine because you want to have free space again.

remove drive letter

You will see that the partition is now free space. The next step is to right click the free space volume and select Delete Partition from the menu. This will change it to unallocated space, which is the only way to merge this space back into (C:).

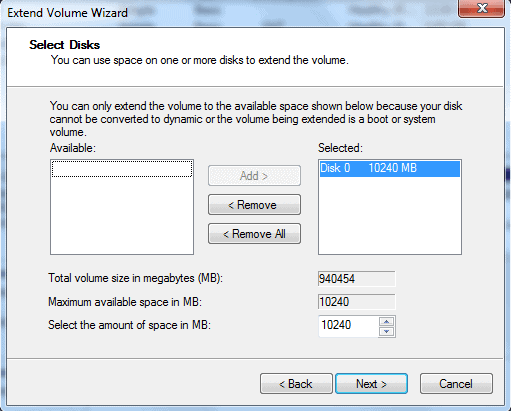
Now you are ready to add the unallocated space back into (C:), so right click on volume (C:) and select Extend Volume from the context menu. The Extend Volume Wizard will open and you basically go through similar steps as you did to create the partition as outlined in the beginning of this tutorial.

extend hard drive

If you are only Extending from one partition, then continue to click Next through all of the prompts, clicking Finish at the end. This will remove the partition and you will no longer see it, as the memory has been put back onto Drive (C:).

Now you have successfully un-partitioned the drive and there is more memory available in Drive (C:). If you created multiple partitions and wanted to clear all of them, keep selecting Delete Volume and then Delete Partition for each one until you get a single unallocated space and follow the steps above to Extend Volume for Drive (C:).
The procedure is similar if you have multiple partitions and only want to delete a portion of them. For example, if you have four partitions like (E:), (204169762, M:), (204169762, L:), and (F:), you may want to delete just two. Let’s say that you want to delete (M:) and (F:). Perform the same steps as you would for single partitions. They will merge together as a single unallocated space. Then open the Extend Volume Wizard as described above. When the Wizard opens, select the unallocated space from the list of available disks and Add it to the remove list if it is not already there.
Regardless of how many partitions you are going to make or how many you want to delete and un-partition, the procedures are the same as detailed above. Just be careful to avoid deleting partitions that contain data you want to save. Backup your system before deleting multiple partitions. This will ensure that no data is lost if you do make the mistake of deleting the wrong partition(s).

You can always regain space on Drive (C:) using this method, thanks to the Disk Management Utility in Windows 7 and Vista. Usually, unless you have a higher capacity hard drive from 500GB – 3TB, you won’t be able to practically create many partitions at all. Removing multiple partitions will only be an issue for users with larger hard drives or users with smaller drives who have allocated too much space to partitions and are running out of space on Drive (C:).

If you are working with multiple virtual machines and dual boot systems, this information can be very useful. By learning all of these basic steps, you can easily progress to creating partitions with different formats such as FAT32 or ext2 and other formats used for different aspects of virtual machines and dual booted operating systems. This should give you the basic tools to master drive partitioning so that you can create any configuration you want. Once again, the customization beauty of Windows 7 and Vista shines through.


© Melanie Gross for gHacks Technology News | Latest Tech News, Software And Tutorials, 2012. | Permalink |
Add to del.icio.us, digg, facebook, reddit, twitter
Post tags: ,